Guide
§ Calendars Affecting Availability
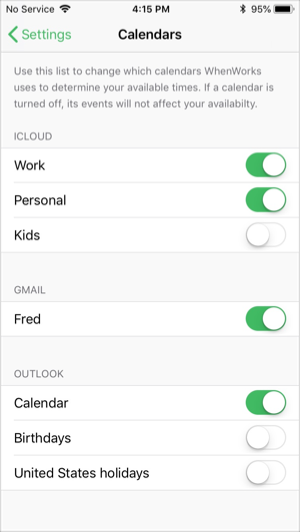
You can control which calendars affect your availability in Settings > Calendars Affecting Availability.
If you’re sharing calendars with co-workers or family members, you may want to disable the shared calendars so that the events on those shared calendars don’t block your free time.
By default, all read-only calendars are disabled but you can enable them if you want.
§ Connecting to Exchange and Office 365
WhenWorks integrates with Exchange and Office 365 through the built-in Calendar app on iOS. Therefore, in order for WhenWorks to access your Exchange or Office 365 calendars, you must configure the Calendar app on iOS to sync with that service.
Here is how to configure Exchange and Office 365 syncing on your iOS device.
Open the Settings app and tap Accounts & Passwords > Accounts > Add Account > Exchange. Then enter your login details.

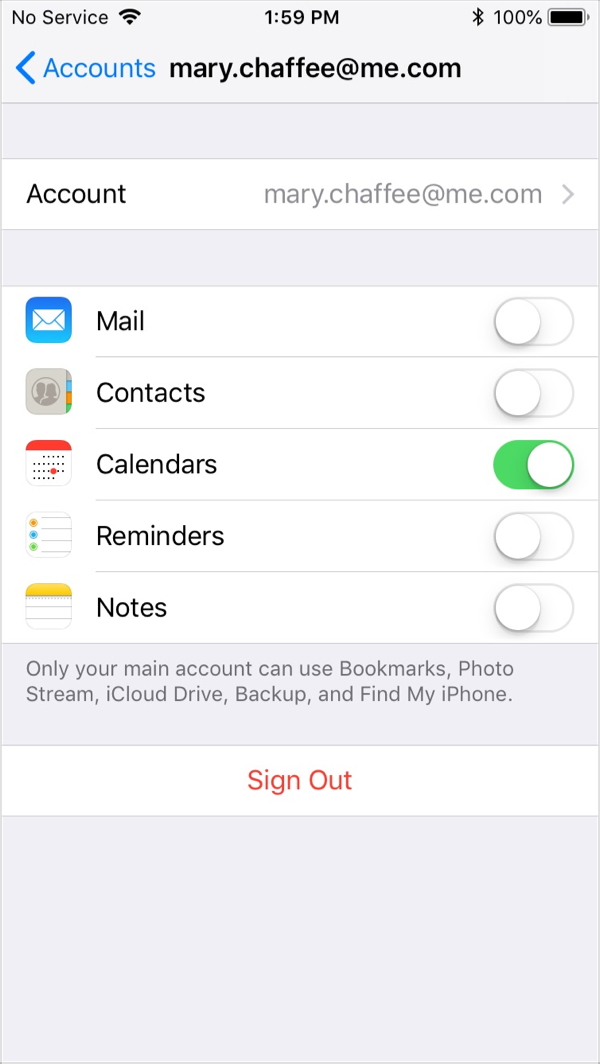
On the next screen make sure that Calendars is enabled.
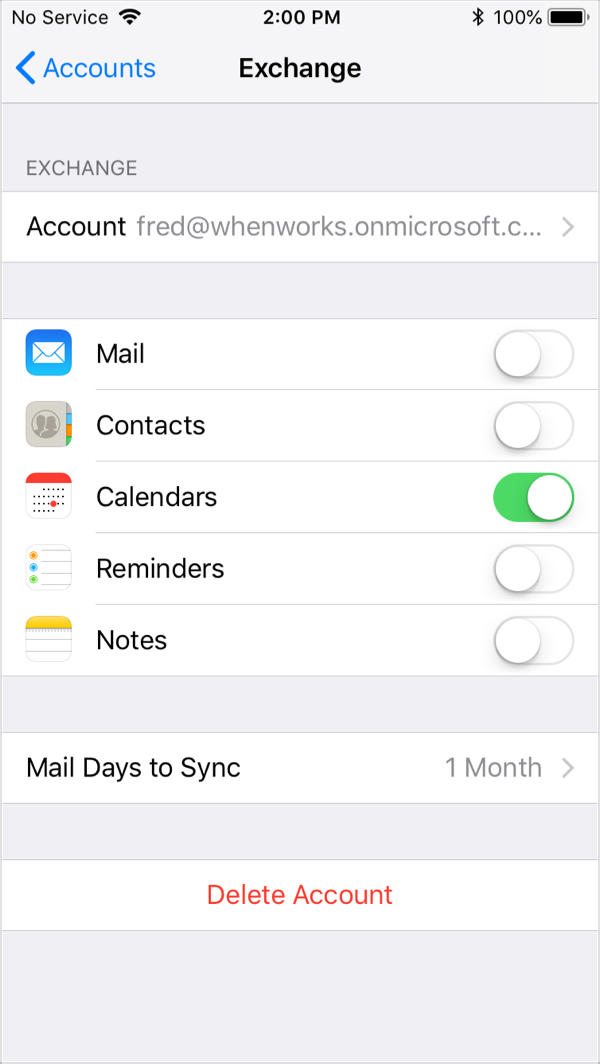
Once your iOS device is syncing with Exchange or Office 365, WhenWorks will be able to access your real-time availability and add appointments to your Exchange or Office 365 calendar.
If there are read-only calendars on your Exchange or Office 365 account, like Birthdays and Holiday calendars, you should disable them from affecting your availability. You can do that by opening WhenWorks and tapping Settings > Calendars Affecting Availability.
§ Connecting to Google Calendar
WhenWorks integrates with Google Calendar through the built-in Calendar app on iOS. Therefore, in order for WhenWorks to access your Google Calendar, you must configure the Calendar app on iOS to sync with Google Calendar.
Here is how to configure Google Calendar syncing on your iOS device.
Open the Settings app and tap Accounts & Passwords > Accounts > Add Account > Google. Then enter your login details.
On the next screen make sure that Calendars is enabled.
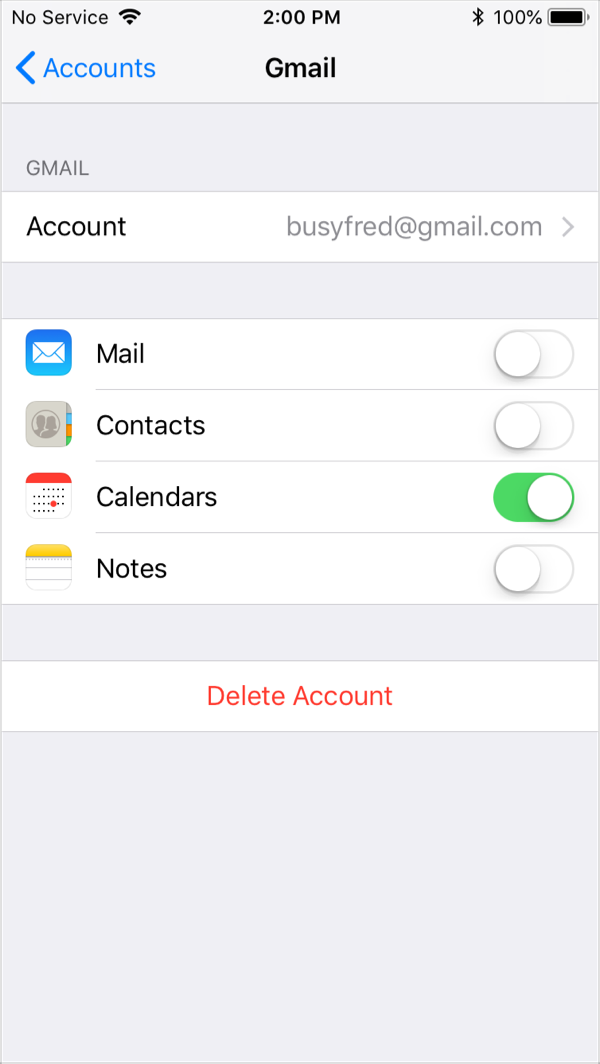
Once your iOS device is syncing with Google Calendar, WhenWorks will be able to access your real-time availability and add appointments to your Google Calendar.
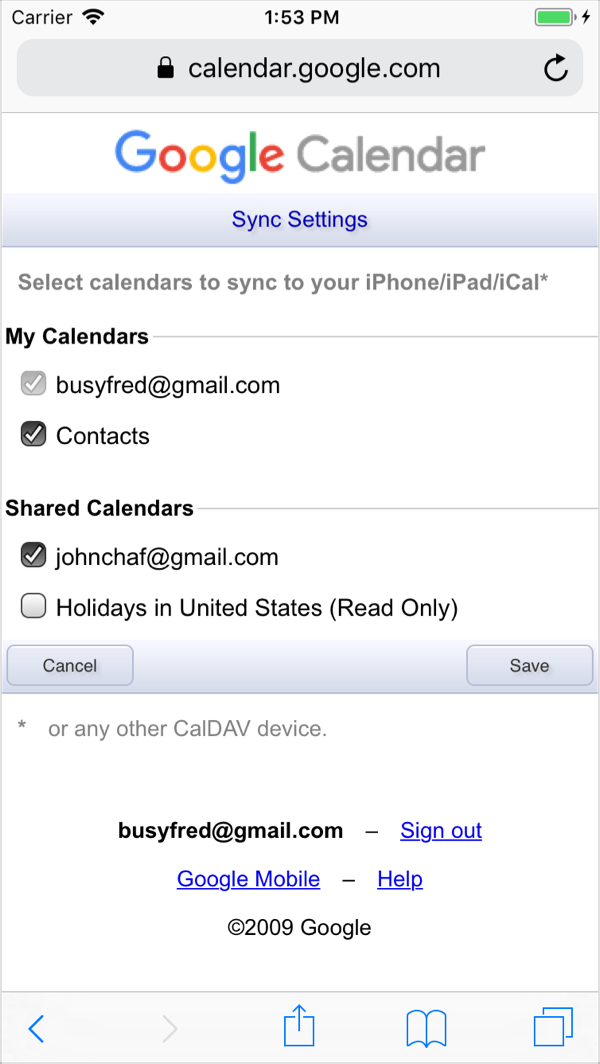
If you are sharing calendars with others on Google, the shared calendars should show up in WhenWorks in Settings > Calendars Affecting Availability.
If some of your Google Calendars are not appearing in the screen above, you may need to enable them by going to Google Calendar Sync Settings in your web browser and selecting the calendars you want to sync to your iOS device.
§ Connecting to Outlook.com
WhenWorks integrates with Outlook.com through the built-in Calendar app on iOS. Therefore, in order for WhenWorks to access your Outlook.com calendars, you must configure the Calendar app on iOS to sync with that service.
Here is how to configure Outlook.com syncing on your iOS device.
Open the Settings app and tap Accounts & Passwords > Accounts > Add Account > Outlook.com. Then enter your login details.
On the next screen make sure that Calendars is enabled.

Once your iOS device is syncing with Outlook.com, WhenWorks will be able to access your real-time availability and add appointments to your Outlook.com calendar.
If there are read-only calendars on your Outlook.com account, like Birthdays and Holiday calendars, you should disable them from affecting your availability. You can do that by opening WhenWorks and tapping Settings > Calendars Affecting Availability.
§ Connecting to iCloud
WhenWorks integrates with iCloud through the built-in Calendar app on iOS. Therefore, in order for WhenWorks to access your iCloud calendars, you must configure the Calendar app on iOS to sync with iCloud.
It’s quite likely that your iOS device is already configured to sync with iCloud. If not, here is how to configure iCloud calendar syncing on your iOS device.
Open the Settings app and tap Accounts & Passwords > Accounts > Add Account > iCloud. Then enter your login details.
On the next screen make sure that Calendars is enabled.
Once your iOS device is syncing with iCloud, WhenWorks will be able to access your real-time availability and add appointments to your iCloud calendar.
§ Event Options
WhenWorks offers several options that you can configure for each Event Type.
- Add to Calendar — The calendar that the event will be created on when a guest books an appointment. This allows you to store some event types on work-related calendars (e.g. Phone Calls or Meetings) and other event types on personal calendars (e.g. Lunch or Drinks) .
- Minimum Notice Before Event — Controls how soon a new event can be scheduled on the current day, to avoid last minute bookings. For example, if it’s currently 10AM and you’ve set a Minimum Notice of 4 hours, the earliest time slot available today will be 2PM.
- Minimum Time Before/After Event — These settings prevent events from getting scheduled back-to-back, so you have adequate time free between appointments. For example, you could use these controls to allow enough time for travel to/from remote appointments.
- Availability Increments — You can display your availability online in 15, 30 or 60 minute intervals on the hour. This used to be a global preference but can now be set on a per-invite basis (e.g. Show 15-minute increments for Phone Calls, and 60-minute increments for Meetings).
- Pre-Booking Description — Information displayed at the beginning of the booking process, where you can explain your services or manage expectations (for example, you could specify pricing for consultations of different lengths).
- Guest Questions — You can prompt guests to answer questions when booking, like providing their phone number or location, and their answers will be written to the event notes. You can even include multiple choice checkbox and radio button questions.
- Event Notes — Information that will be stored to the notes field once the appointment is created.
§ Getting Started
WhenWorks allows clients and colleagues to book appointments with you online.
Scheduling appointments involves two parties:
- Host – a user who has created a WhenWorks account for Guests to view their availability and book appointments with them online. The Host must install the WhenWorks app on an iOS device running iOS 11 or greater.
- Guest – a user who visits the WhenWorks website to book appointments with a Host. Guests do not need to run the WhenWorks app. All a Guest needs is a web browser.
This Quick Start Guide is designed for the Host and provides an overview of how to use the iOS app to create event types and publish your availability so Guests can book appointments with you online.
Installing WhenWorks
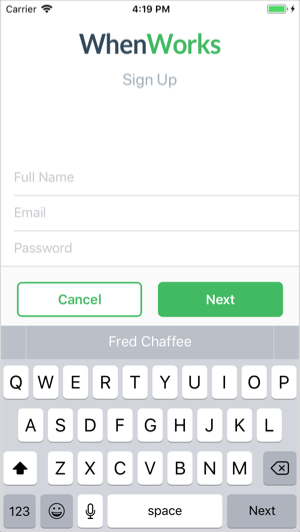
To get started, download and install the WhenWorks app on your iOS device from the App Store and launch it. The first thing you’ll need to do is create a free WhenWorks account.
The name and email address you use for the account is what guests will see when booking appointments with you online, so enter an appropriate name and email address. You can always change it later in Settings.
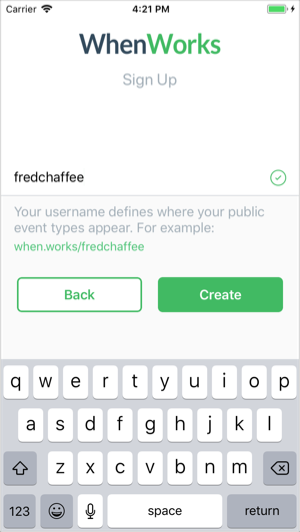
The username you enter will be used for your WhenWorks Public Scheduling page, where you can optionally publish events for anyone to schedule with you. For example, a personal trainer could publish events to their WhenWorks Public Scheduling page that allows new or existing customers to schedule training sessions with them. All WhenWorks accounts include a Public Scheduling page but you are not required to publish events on it. You control which event types are private or public.
Creating an Event Type
Once you’ve finished the initial configuration, the Event Types screen is displayed.
![]()
Event Types define when, where and how long you are available to accept appointments. For example, you could create a “Phone Call” event that lasts 30 minutes and can be booked on weekdays from 9am to 5pm, or a “Lunch” event that can be booked weekdays at noon for 1 hour.
To create an Event Type:
1. Tap New Event Type > Custom Event Type
Tap New Event Type and you will be presented with the Choose Event Type screen where you can create a Custom Event Type or start from a built-in template. Tap Custom Event Type.

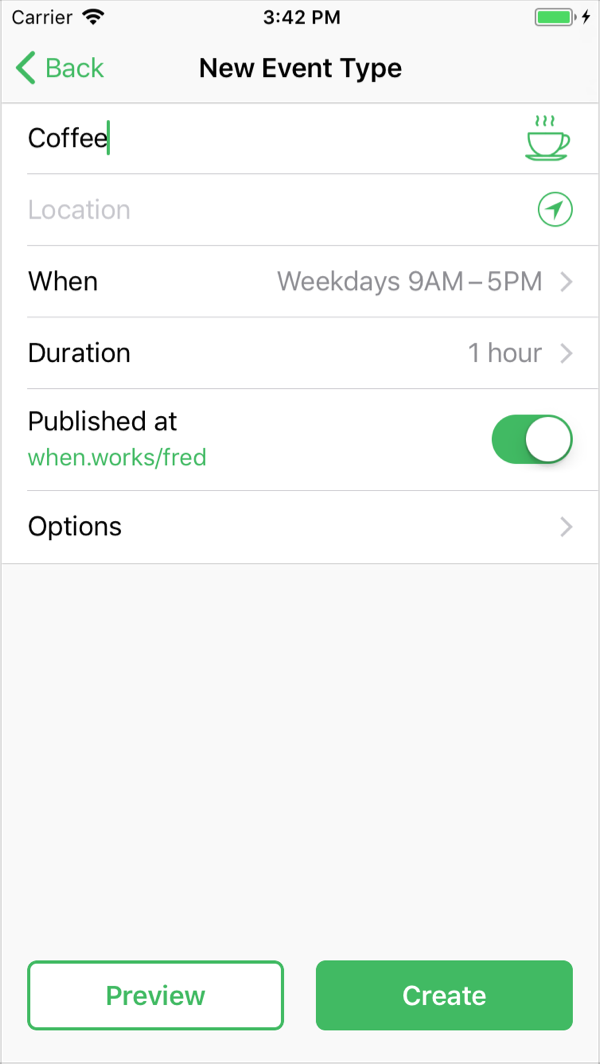
2. Create a Coffee event type
- Title — Enter the word “Coffee” into the Title field.
- Icon — As you type the word Coffee, the Set Icon label on the right will change to a coffee cup icon. You can change the icon to something else, if you wish, by tapping it.
- Published — Enable the Published switch so that the new Coffee event will appear on your Public Scheduling page.
Leave all other settings as they are and tap Create.
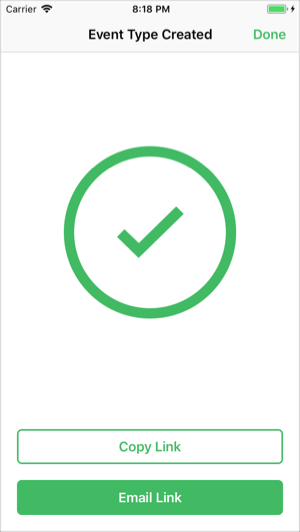
3.Tap Email Link, and send yourself an email
A confirmation screen will appear with buttons for copying or emailing the link. Tap Email Link, address the email to yourself and tap Send.
Booking an appointment
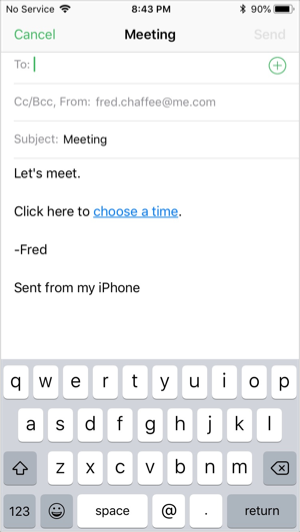
Next, open the email you sent to yourself to review the process of a guest booking a meeting with you.
1. Open Email and tap Book Online
Open the email message you just sent to yourself on your computer or mobile device and tap the Book Online button.
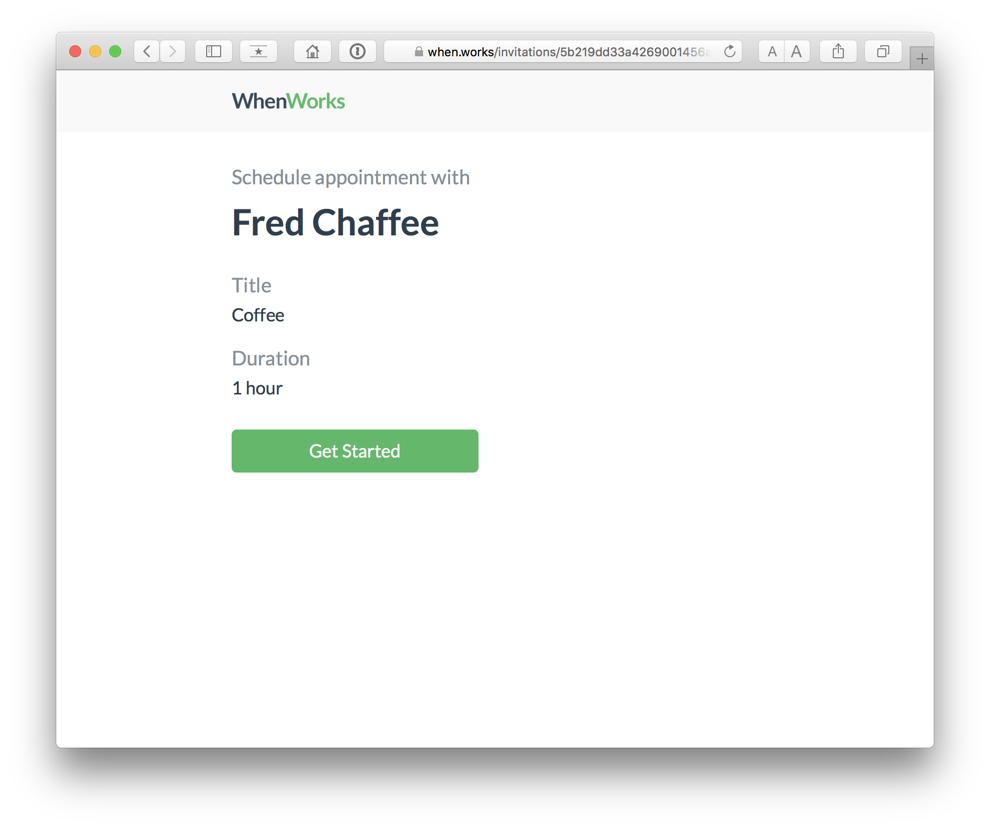
You’ll be taken to the WhenWorks website where the following series of pages appear allowing a guest to view your availability and book a meeting with you.
2. Click Get Started
The Get Started page displays basic info about the event type.
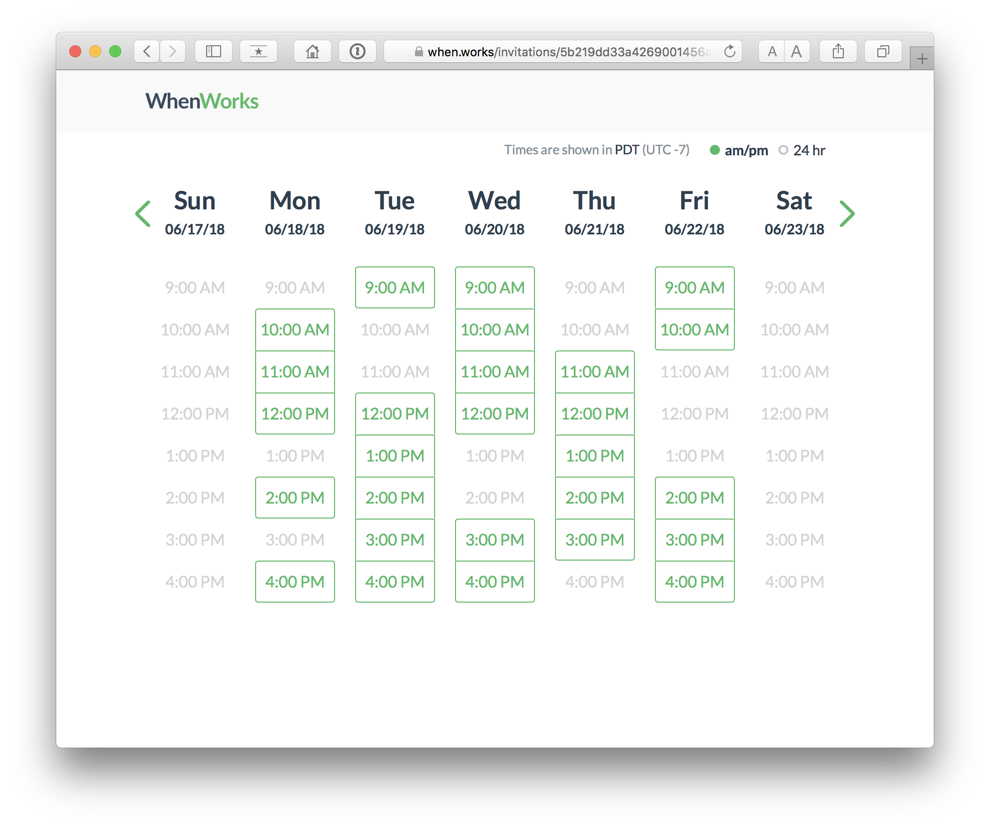
3. View Availability and choose a time
The Availability grid shows your real-time availability. A green cell means you are available. A gray cell means you are busy. Tap a green cell to go to the next screen.
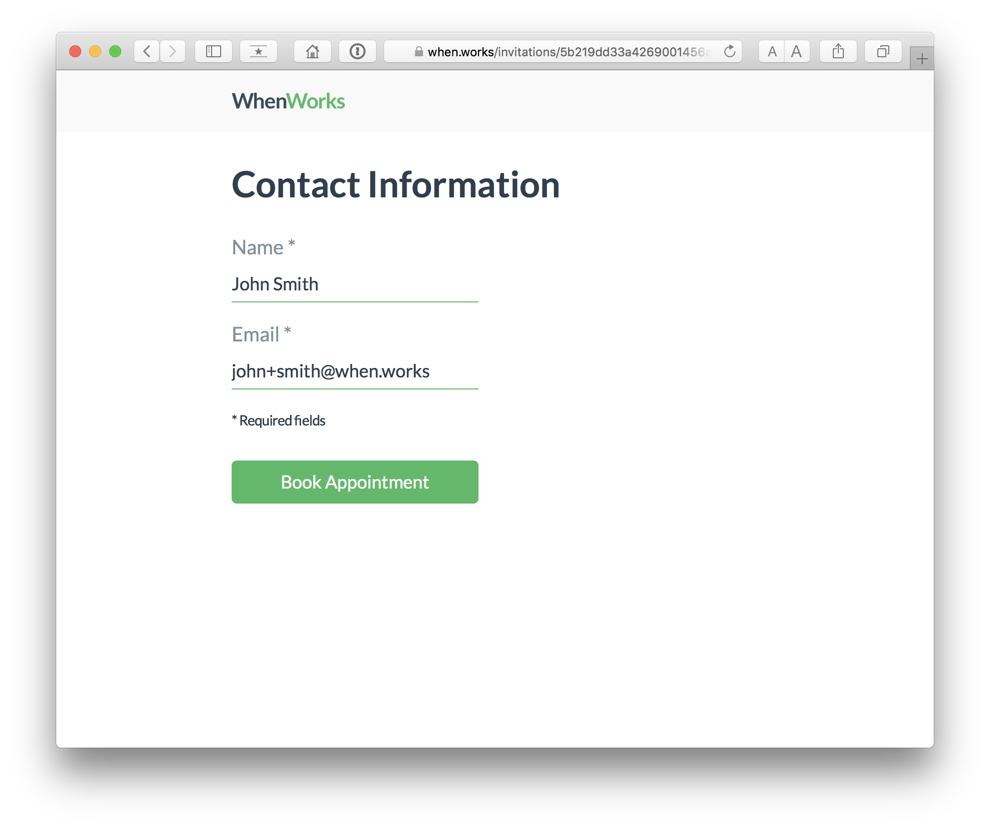
4. Enter Contact Info
After selecting a time for the meeting, the guest must provide their contact info to book the appointment.
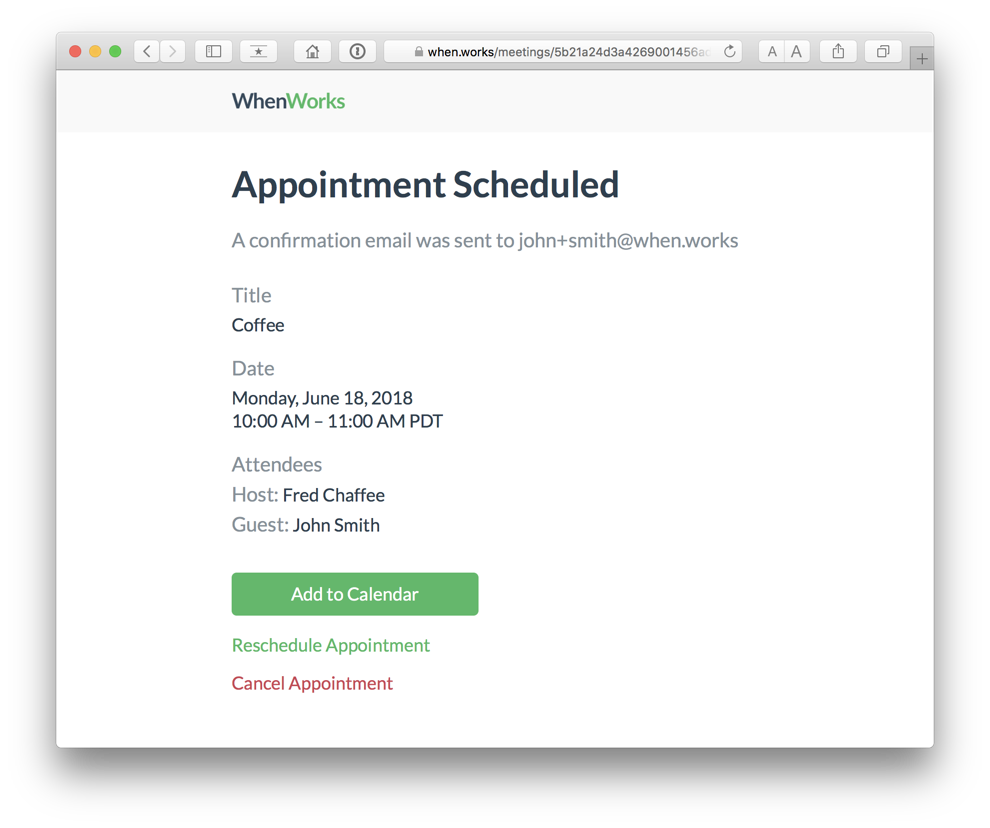
5. Confirmation Page
The confirmation page displays the details of the event that was booked and gives the guest an opportunity to add the event to their calendar.
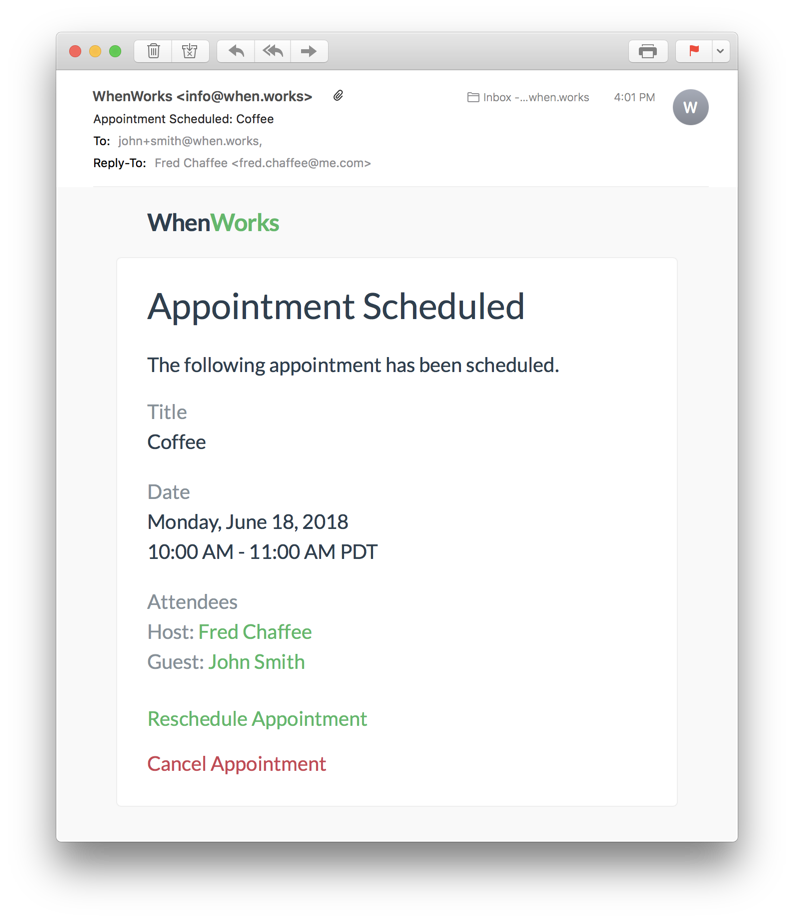
6. Confirmation Email
Both the Host and Guest will receive an email confirmation.
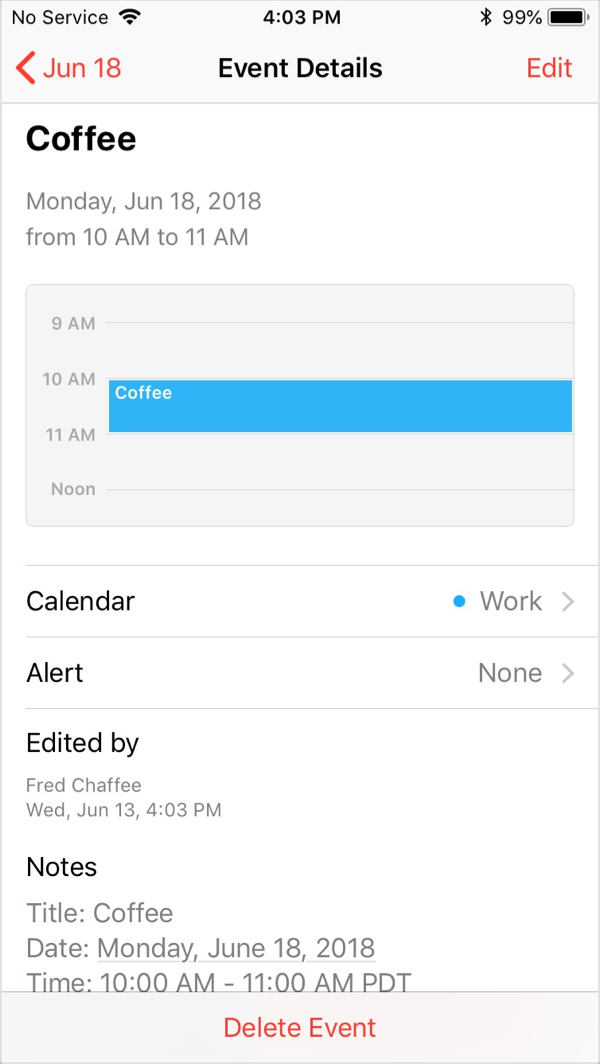
7. Event is automatically added to the Host’s calendar
Launch the Calendar app on your iPhone and view the date the sample Coffee event was scheduled on. The event should appear in your calendar. Tap on it to view the Notes, which will include additional details including the email address of the Host and Guest and links that can be used by the Host or Guest to cancel or reschedule the appointment.
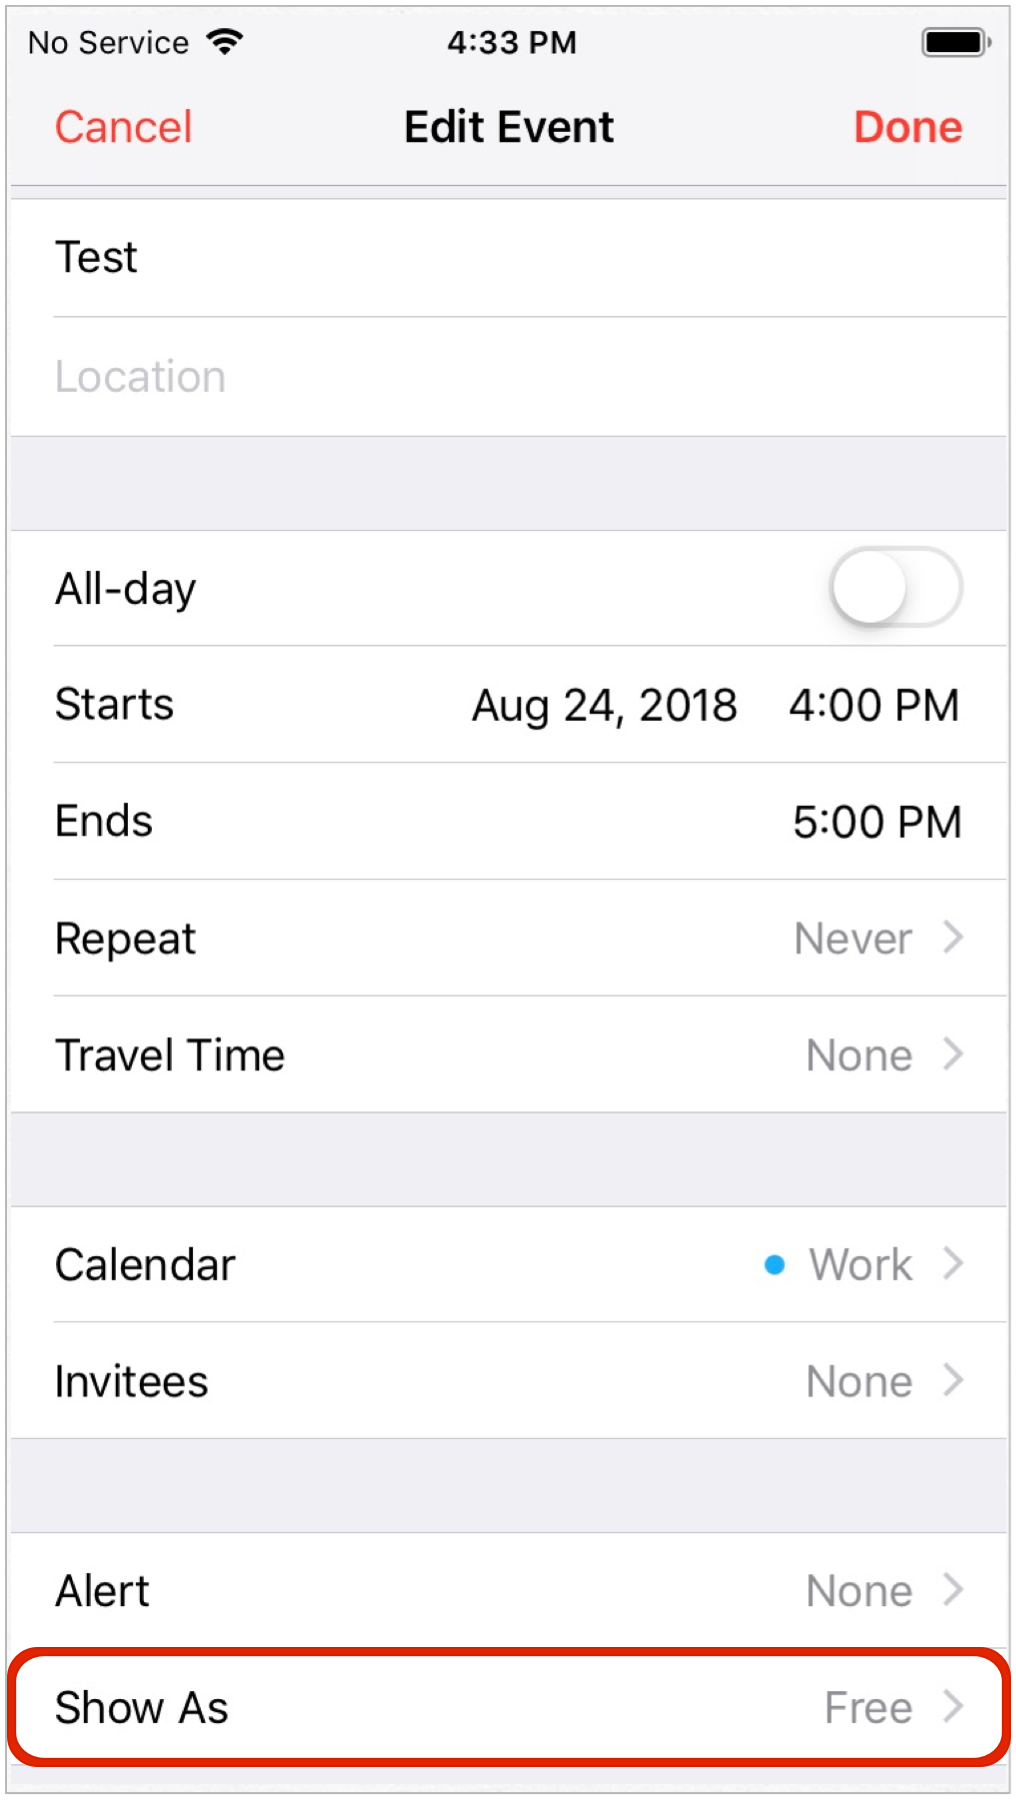
§ Marking events as Free or Busy
Apple Calendar allows you to mark individual events as Free or Busy, to control whether or not the event affects your availability. If an event in your calendar is marked as Free, then you will appear as available during that time slot online when someone books a meeting with you on WhenWorks.
To mark an event as Free:
- View the event in Apple Calendar on your iOS device
- Tap Edit
- Tap Show As > Free
Once an event is marked as Free, it will not affect your availability in WhenWorks.
§ Scheduling Links
Event Links
Each event type you create has a unique URL that you can send to clients and colleagues to book that particular event with you. To send a link for a specific event to someone, open the Event, then tap either Copy Link or Email Link:

- Copy Link – will copy the URL for the event to the clipboard. You can then paste the link into an email or text message.
- Email Link – will create a new email message containing the details of the event and a button the guest can click to Book Online.
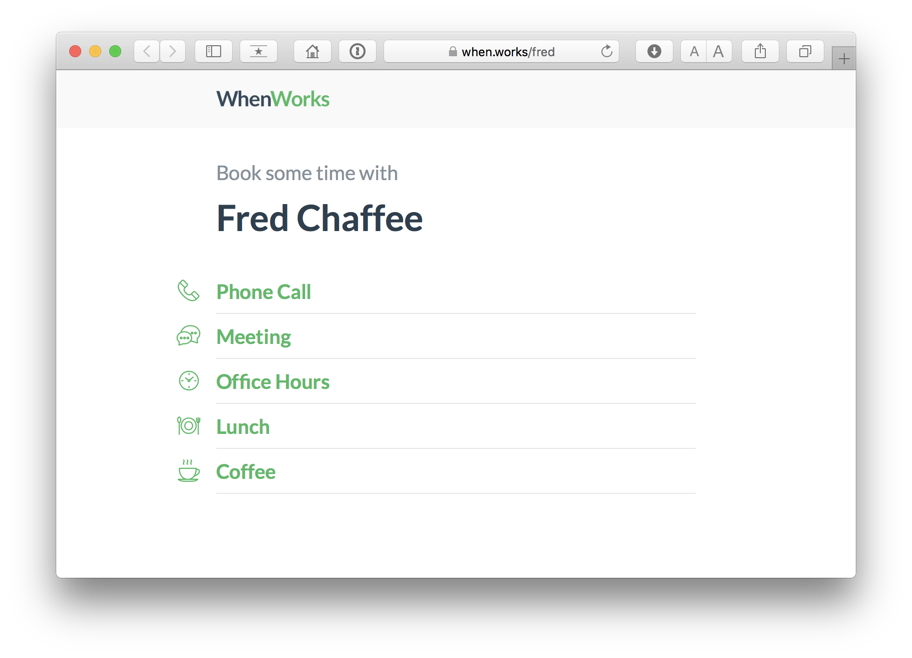
Public Scheduling Page Link
Each WhenWorks account includes a Public Scheduling Page with a custom URL (e.g. https://when.works/fred) . Only events that have been Published will appear here. This page ideal for giving clients multiple options for the type of event they may want to schedule with you.
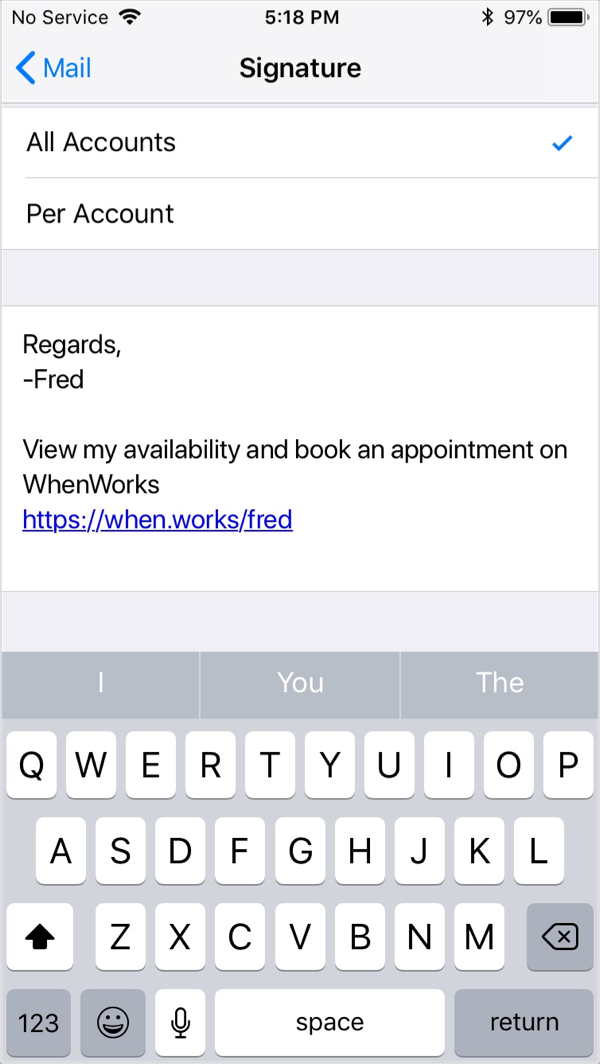
Adding a link to your email signature
You may want to add a link to a specific event or to your Public Scheduling Page to your email signature so that anyone you correspond with can easily schedule an appointment with you. Here’s how to do so:
- Copy the link for a specific event or your Public Scheduling Page to your clipboard.
- Open the Settings app and choose Mail > Signature.
- Add some text to your signature (e.g. “Click here to view my availability and book an appointment”) and paste the link into your email signature.